

Table of Contents
Remember the satisfaction of biting into a perfectly crispy Gluten Free Chicken Tenders as a kid? That distinctive crunch giving way to juicy, tender chicken inside ? For those of us following a gluten free lifestyle, those beloved chicken tenders seemed lost forever when regular flour became off limits. I still remember my daughter’s disappointed face when her celiac diagnosis meant saying goodbye to drive thru chicken tenders on busy weeknights.
That disappointment launched my three year quest to create gluten free chicken tenders that didn’t taste like, well… a compromise. After countless experiments (and admittedly some spectacular failures), I’ve finally cracked the code to making gluten free chicken tenders that are genuinely better than the wheat flour originals we used to enjoy.
These aren’t just “good for being gluten free” these are chicken tenders that have my gluten eating friends and family members reaching for seconds and thirds! The secret lies in a special blend of gluten free ingredients that create that authentic crispy exterior while keeping the chicken incredibly moist inside.
What makes these gluten free chicken tenders truly restaurant quality is the attention to technique. Most home cooks miss crucial steps that restaurants use to achieve that perfect texture. Throughout this post, I’ll share 10 professional tips that transform ordinary gluten free chicken tenders into an extraordinary meal that nobody would guess is gluten free.
Whether you’re cooking for someone with celiac disease, have a gluten sensitivity yourself, or simply want to explore Gluten Free Chicken Tenders options, this recipe delivers on flavor without compromising on texture or satisfaction. I promise these tenders will become a regular request in your household they certainly are in mine!
Why This Recipe Is a Must Try
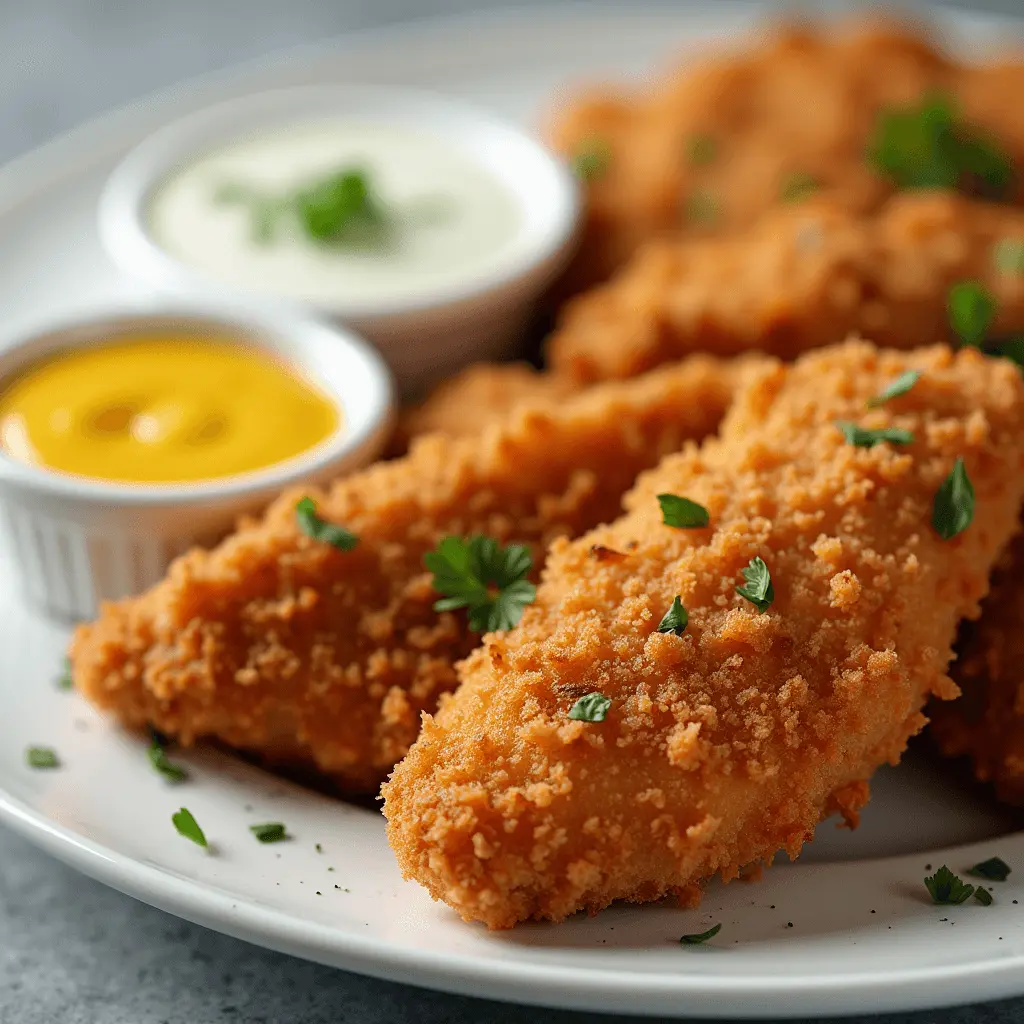
Genuinely Crispy Coating: No more soggy, falling apart breading that plagues most gluten free recipes.
Kid Approved: My pickiest eaters can’t tell the difference from their favorite restaurant tenders!
Freezer Friendly: Make a big batch and freeze for quick weeknight dinners.
Versatile: Works perfectly in the oven, air fryer, or traditional frying method.
Allergen Adaptable: Can easily be made dairy free and egg free with simple swaps.
Budget Friendly: Uses common gluten free ingredients you likely already have.
Healthier Option: Significantly less sodium and additives than restaurant or frozen versions.
Fool Proof Method: Even novice cooks can achieve perfect results every time.
Restaurant Quality Taste: The double dredge technique ensures authentic flavor and texture.
Quick Preparation for gluten free chicken tenders: Ready in under 30 minutes from start to finish, perfect for busy weeknights when you want easy gluten free chicken tenders.
Ingredients Breakdown & Substitutions
For the Chicken:
| Ingredient | Why It’s Important | Substitutions |
| Chicken Tenders (2 lbs) | The star of the show, naturally gluten free | Boneless chicken thighs or breast cut into strips |
| Buttermilk (1 cup) | Tenderizes the chicken and helps coating adhere | Dairy free milk + 1 tbsp vinegar or lemon juice |
| Salt (1 tsp) | Enhances flavor and helps brine the chicken | Reduced sodium salt for lower sodium diets |
| Garlic Powder (1 tsp) | Adds depth of flavor to the marinade | Onion powder or 2 cloves fresh minced garlic |
| Paprika (½ tsp) | Adds subtle color and flavor | Smoked paprika for a deeper flavor profile |
For the Gluten Free Coating:
| Ingredient | Why It’s Important | Substitutions |
| Gluten Free Flour Blend (1½ cups) | Creates the base for the coating | Make your own blend with rice flour, potato starch, and tapioca starch |
| Cornstarch (½ cup) | Creates extra crispiness | Arrowroot powder works as a 1:1 substitute |
| Gluten Free Panko Breadcrumbs (1 cup) | Provides texture and crunch | Crushed gluten free corn flakes or rice cereal |
| Baking Powder (1 tsp) | Creates a lighter, airier crust | Don’t substitute with baking soda |
| Salt (1 tsp) | Enhances overall flavor | Sea salt or kosher salt work well |
| Black Pepper (½ tsp) | Adds subtle heat | White pepper for a milder option |
| Garlic Powder (1 tsp) | Adds savory depth | Onion powder is a good alternative |
| Paprika (1 tsp) | Contributes color and subtle flavor | Cayenne for heat lovers (use ¼ tsp) |
| Dried Herbs (1 tsp total) | Adds complexity and aroma | Mix and match thyme, oregano, or parsley |
Finding quality gluten free breadcrumbs is essential for the best texture. My favorite brands include Ian’s, Kikkoman, and Schar, all readily available at most major grocery stores or online. If you can’t find gluten free panko specifically, processing regular gluten free breadcrumbs briefly in a food processor creates a similar texture.

Step by Step Instructions with Expert Tips
Follow these detailed steps to create perfectly crispy gluten free chicken tenders every time. Pay special attention to the pro tips they make all the difference between good and restaurant quality results!
Preparation Phase
- Prepare the marinade for the gluten free chicken tenders: In a large bowl, combine buttermilk, salt, garlic powder, and paprika, stirring until well mixed. Using buttermilk creates tender chicken while building flavor deep into the meat.
- Add the chicken: Place chicken tenders in the buttermilk mixture, ensuring each piece is fully submerged. Cover with plastic wrap and refrigerate for at least 30 minutes (or up to 4 hours for maximum tenderness). This marinating step is non negotiable for truly tender, flavorful chicken!
- Set up your coating station: While the chicken marinates, prepare two shallow dishes. In the first dish, combine 1 cup of gluten free flour blend with cornstarch, ½ teaspoon salt, ¼ teaspoon pepper, and ½ teaspoon garlic powder. In the second dish, mix remaining gluten free flour, gluten free panko breadcrumbs, baking powder, remaining salt, pepper, garlic powder, paprika, and dried herbs.
- Preheat your cooking method: For oven baking, preheat to 425°F and line a baking sheet with parchment paper, then place a wire rack on top. For air frying, preheat to 400°F. For traditional frying, heat 2 inches of oil to 350°F in a heavy bottomed pot. Using a thermometer ensures your oil is at the perfect temperature too cool makes greasy tenders, too hot burns the coating.
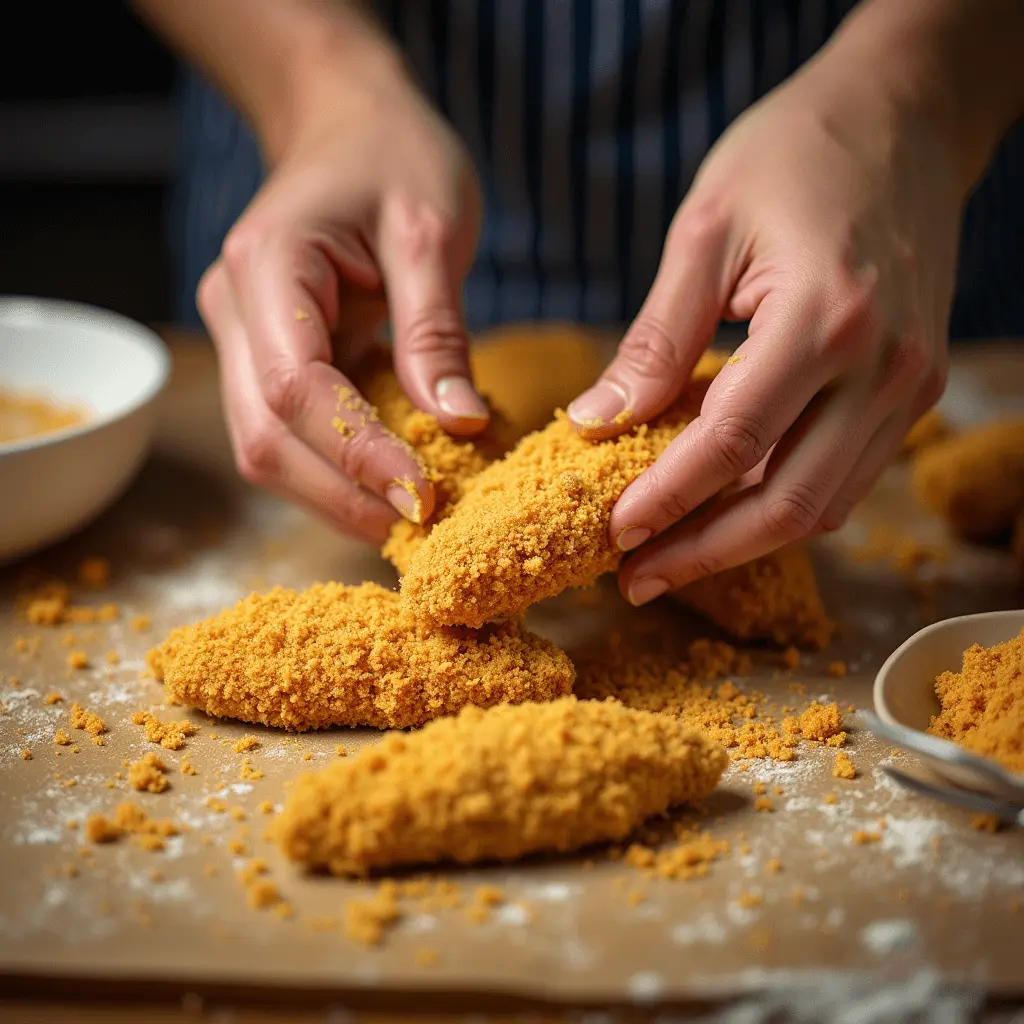
Coating Process (The Secret to Success!)
- Remove chicken from marinade: Take each tender out individually, allowing excess buttermilk to drip off. Don’t discard the marinade yet! Trouble-shooting tip: If your chicken pieces are very large, consider cutting them into more uniform sizes for even cooking.
- First dredge: Place each chicken tender into the first flour mixture, pressing gently to ensure complete coverage. Shake off excess flour. This initial dry coating creates a barrier that helps the second coating stick properly.
- Second wet dip: Quickly dip the floured chicken back into the buttermilk marinade. This is professional tip #1: The double dip method creates those perfect craggy edges that get extra crispy!
- Final coating: Transfer the wet chicken to the panko flour mixture, pressing firmly on both sides to adhere as much coating as possible. Place coated tenders on a plate while you finish the batch. Let them rest for 5 minutes before cooking to help the coating set this prevents it from falling off during cooking.
Cooking Methods
- Choose your cooking method: a) For oven baking, preheat oven to ensure perfectly cooked gluten free chicken tenders : Spray the wire rack with cooking spray. Place tenders on the rack without touching. Spray tenders lightly with oil spray. Bake for 15-18 minutes, flipping halfway, until internal temperature reaches 165°F. Using a rack allows hot air to circulate around the entire tender, creating all around crispiness. b) For air frying: Spray the basket with oil. Place tenders in a single layer (work in batches if needed), spray lightly with oil. Cook at 400°F for 10-12 minutes, flipping halfway, until golden brown and 165°F internally. Don’t overcrowd your air fryer this is why restaurant food is crispier than homemade versions! c) For pan frying: Carefully place 3-4 tenders in hot oil. Fry for 3-4 minutes per side until golden brown and internal temperature reaches 165°F. Transfer to a paper towel lined plate. Professional tip #2: Add a tablespoon of buttermilk to your frying oil it creates extra crispy edges as it splashes and cooks on the coating.
- Rest before serving to allow the flavors of the skinless chicken breast to develop : Allow cooked tenders to rest for 2-3 minutes before serving. This allows the juices to evenly redistribute throughout the chicken. Skipping this step can result in dry chicken inside despite your best efforts.
Troubleshooting Common Issues:
- If coating falls off during cooking: Make sure chicken is patted dry before the first flour coating, and press coating firmly onto each piece.
- If tenders aren’t browning properly: For oven method, finish with 1-2 minutes under the broiler for extra color.
- If tenders are browning too quickly but aren’t cooked through: Lower cooking temperature and cover loosely with foil while baking.
- If coating tastes bland: Add an extra pinch of salt to the final breading mixture gluten free flours often need more seasoning than wheat flour.
Storage, Make Ahead, & Freezing Tips
These gluten free chicken tenders maintain their quality surprisingly well when stored properly, making them perfect for meal prep or batch cooking.
Short Term Storage
- Refrigerate: Store cooled tenders in an airtight container lined with paper towels for up to 3 days. The paper towels help absorb moisture that would otherwise make the coating soggy.
- Best reheating method: For maximum crispiness, reheat in a 375°F oven or air fryer for 3-5 minutes until hot and crisp again. Avoid microwaving if possible, as it makes the coating chewy rather than crispy.
Freezing Instructions
- Freeze after cooking: Allow the breaded chicken tenders to cool completely, then place them in a single layer on a parchment lined baking sheet. Freeze until solid (about 2 hours), then transfer to a freezer safe bag or container with parchment between layers.
- Freeze before cooking: After coating the raw chicken tenders, place them on a parchment lined baking sheet and freeze until solid. Transfer to a freezer safe container with parchment between layers. Label with the date and cooking instructions for convenience.
- Frozen storage duration: Properly stored chicken nuggets will maintain quality for up to 3 months.
Reheating From Frozen
- Pre cooked frozen tenders: Bake at 375°F for 15-18 minutes or air fry at 375°F for 8-10 minutes until heated through and crispy.
- Raw frozen tenders: Cook according to the original instructions, adding 5-7 minutes to the cooking time. Always check that internal temperature reaches 165°F.
Creative Ways to Use Leftovers
- Chop and add to a gluten free wrap with lettuce, tomato, and ranch dressing
- Slice and top a salad for a protein boost
- Make mini chicken parmesan by topping with marinara and gluten free cheese
- Create a gluten free chicken tender bowl with rice, vegetables, and your favorite sauce
- Dice and add to gluten free pasta with a light cream sauce for a quick dinner
Professional tip #3: When reheating, sprinkle a few drops of water on the tenders before placing in the oven the steam helps revive the inside moisture without affecting the crispy exterior.
Creative Variations & Serving Ideas
Transform these gluten free chicken tenders with these exciting flavor variations and serving suggestions that will keep your family asking for more!
Flavorful Variations
- Spicy Buffalo Tenders: Add 1 tablespoon of hot sauce to the buttermilk marinade and serve with blue cheese dressing (check for gluten free status).
- Lemon Herb Tenders: Mix 1 tablespoon fresh lemon zest and 1 tablespoon Italian herb blend into the final coating mixture for a bright, aromatic twist.
- Honey BBQ Tenders: Brush cooked tenders with a mixture of equal parts honey and your favorite gluten free BBQ sauce during the last 2 minutes of cooking.
- Parmesan Ranch Tenders: Add ¼ cup of gluten free grated parmesan cheese and 1 tablespoon ranch seasoning mix (check label for gluten free) to your final coating mixture.
- Coconut Crusted Tenders: Replace half of the gluten free panko with unsweetened shredded coconut for a tropical twist these pair wonderfully with a gluten free sweet chili sauce!
Dipping Sauce Ideas (All Gluten Free)
- Classic Honey Mustard: Combine ¼ cup mayo, 2 tablespoons honey, and 2 tablespoons gluten free Dijon mustard to create a delicious dip for your chicken strips.
- Sriracha Mayo: Mix ¼ cup mayo with 1-2 teaspoons sriracha sauce (adjust for heat preference).
- Avocado Ranch: Blend ½ ripe avocado with ¼ cup gluten free ranch dressing until smooth.
- Sweet and Sour: Combine ¼ cup apricot preserves with 2 tablespoons rice vinegar and 1 tablespoon gluten free soy sauce to create a delicious glaze for your chicken breast tenders.
- Garlic Aioli: Mix ¼ cup mayo with 2 minced garlic cloves and a squeeze of lemon juice.
Perfect Pairings
- Side Dishes: Serve with sweet potato fries, gluten free mac and cheese, coleslaw, or a simple green salad for a complete meal.
- For Kids: Create a gluten free chicken tender “box meal” with apple slices and carrot sticks.
- For Adults: Pair with roasted Brussels sprouts with bacon or a quinoa and vegetable pilaf for an elevated dinner.
- Party Presentation: Cut cooked Gluten Free Chicken Tenders into bite sized pieces, insert toothpicks, and serve with multiple dipping sauces for an appetizer platter that everyone will love.
Professional tip #4: For a complete gluten free “fast food” experience at home, serve these tenders with frozen gluten free french fries cooked at the same time in another part of your oven!
Nutrition Information
Understanding the nutritional content of your gluten free chicken tenders can help you make informed choices about how they fit into your overall diet. The values below are approximate per serving (2-3 tenders) when prepared using the oven baked method.
Nutrition Facts Per Serving (3 tenders, oven baked)
| Nutrient | Amount | % Daily Value |
| Calories | 320 | – |
| Total Fat | 12g | 15% |
| Saturated Fat | 3g | 15% |
| Trans Fat | 0g | – |
| Cholesterol | 85mg | 28% |
| Sodium | 650mg | 28% |
| Total Carbohydrate | 24g | 9% |
| Dietary Fiber | 2g | 7% |
| Total Sugars | 1g | – |
| Protein | 29g | 58% |
| Vitamin D | 0mcg | 0% |
| Calcium | 80mg | 6% |
| Iron | 1.8mg | 10% |
| Potassium | 350mg | 7% |
*Percent Daily Values are based on a 2,000 calorie diet
Nutritional Benefits:
- These gluten free chicken tenders are high in protein, providing nearly 60% of your daily needs.
- By using gluten free ingredients, they’re suitable for those with celiac disease or gluten sensitivity.
- When baked rather than fried, they contain significantly less fat than restaurant versions.
- The recipe can be further modified to reduce sodium by using less salt in the coating.
- For extra nutrition, consider using almond flour as part of your gluten free flour blend, which adds healthy fats and additional protein.
Note: Nutrition values will vary based on specific ingredients used and cooking method. Air fried tenders will have similar nutritional values to oven baked, while traditional pan fried tenders will have approximately 8-10g more fat per serving.
Expert Tips & FAQs
After testing this recipe dozens of times and hearing feedback from both Gluten Free Chicken Tenders and gluten eating recipe testers, I’ve compiled these expert tips and answers to the most common questions to ensure your gluten free chicken tenders turn out perfectly every time.
10 Pro Tips for Perfect Gluten Free Chicken Tenders
- Temperature matters: Always bring your chicken to room temperature for 15 minutes before cooking for more even results.
- Pat dry after marinating: Use paper towels to remove excess moisture before the first coating this creates a better foundation.
- Use one hand for wet, one for dry: Keep one hand for handling the chicken in liquid and the other for dry ingredients to prevent the dreaded “breaded fingers” mess.
- Don’t skip the rest time: The 5 minute rest after coating allows the gluten free breading to adhere better to the chicken.
- Check your oil temperature: If pan frying, maintain 350°F too hot burns the coating, too cool makes it soggy.
- Create texture with panko: The combination of gluten free flour and panko creates the perfect texture contrast.
- Spray before baking: A light spray of oil on coated tenders before baking helps achieve that golden brown color.
- Use a meat thermometer: Chicken is done at 165°F checking prevents dry, overcooked tenders.
- Season aggressively: Gluten free flour blends often need more seasoning than traditional flour to achieve the same flavor impact.
- Batch fry correctly: When pan frying, never crowd the pan this lowers oil temperature and creates soggy coating.
Frequently Asked Questions
Why does my gluten free breading fall off during cooking?
The most common reason is not allowing the chicken breast to marinate long enough or skipping the rest period after coating. The buttermilk needs time to tenderize the chicken breast tenders and help the coating adhere. Also, be sure to firmly press the coating onto the chicken rather than just tossing it.
Can I use regular milk instead of buttermilk?
Yes, but you’ll need to add acidity. Mix 1 cup of regular milk with 1 tablespoon of lemon juice or white vinegar and let it sit for 5 minutes before using. This creates a buttermilk substitute that provides the necessary tenderizing acid.
My gluten free chicken tenders aren’t as crispy as I’d like. What went wrong?
Several factors affect crispiness:
1) Make sure your oven or oil is hot enough before cooking,
2) Don’t overcrowd the pan or air fryer basket,
3) The cornstarch ratio might need adjusting try increasing to ¾ cup for extra crunch,
4) Make sure you’re using fresh baking powder, which helps create a lighter crust.
How can I make these dairy free as well as gluten free?
Replace buttermilk with a non dairy milk alternative (almond, soy, or oat milk work well) mixed with 1 tablespoon of lemon juice or vinegar. Let the mixture sit for 5 minutes before using to allow it to slightly curdle and thicken.
My gluten free coating tastes gritty or bland. How can I fix this?
Rice flour based gluten free blends can sometimes have a slightly gritty texture. For smoother results, look for a blend that includes tapioca starch and potato starch. For bland flavor, increase your seasonings by about 25% gluten free flours don’t carry flavor as well as wheat flour.
Can I make these without eggs since many gluten free people also have egg allergies?
Yes! This recipe is already egg free, using buttermilk as the binding agent instead of eggs. This makes it perfect for those with multiple food sensitivities.
Conclusion
Creating truly delicious gluten free chicken tenders doesn’t require professional culinary training just the right techniques and ingredients! With these 10 restaurant quality tips, you can serve up crispy, juicy gluten free chicken tenders that no one will believe are gluten free. The double dredge method, proper marination, and seasoning balance are the secrets that transform this simple dish into something special.
Remember that gluten free cooking is all about adaptation and creativity. Don’t be afraid to experiment with different seasoning blends and dipping sauces to make this recipe your own. And if you’re new to gluten free cooking, know that successes like these crispy chicken tenders prove that a gluten free diet doesn’t mean sacrificing flavor or texture.
I’d love to hear how your gluten free chicken tenders turn out! What’s your favorite dipping sauce to serve with chicken tenders? Let me know in the comments section below if you prefer Gluten Free Chicken Tenders recipes!
Don’t forget to subscribe to my newsletter for more tried and tested gluten free recipes delivered straight to your inbox!
Happy cooking!
1 thought on “Gluten Free Chicken Tenders: 10 Tips for Restaurant Quality Results”
Comments are closed.