
Table of Contents
The Perfect Marriage of Two Comfort Food Classics
Have you ever found yourself torn between ordering a gooey grilled cheese sandwich or a hearty burrito? That impossible decision haunted my late-night cravings for years until one fateful evening when inspiration struck in my kitchen. With leftover tortillas in one hand and a block of cheddar in the other, the grilled cheese burrito was born in my home – and it changed everything.
What started as a desperate hunger experiment has become my most requested recipe from friends and family. It combines the crispy, buttery exterior of a perfect grilled cheese with the satisfying, customizable fillings of a burrito. It’s the comfort food crossover you never knew you needed but won’t be able to live without.
I’ve spent countless hours perfecting this grilled cheese burrito recipe, testing different cheese combinations, filling options, and grilling techniques. The result? A golden-brown masterpiece that delivers the perfect cheese pull with every bite while keeping all your favorite burrito fillings secure inside a crispy tortilla cocoon.
Unlike traditional burritos that can sometimes fall apart or regular grilled cheese that might leave you hungry an hour later, this fusion creation solves both problems. The tortilla creates a more substantial meal than bread alone, while the grilled exterior keeps everything perfectly contained – no filling casualties on your plate.
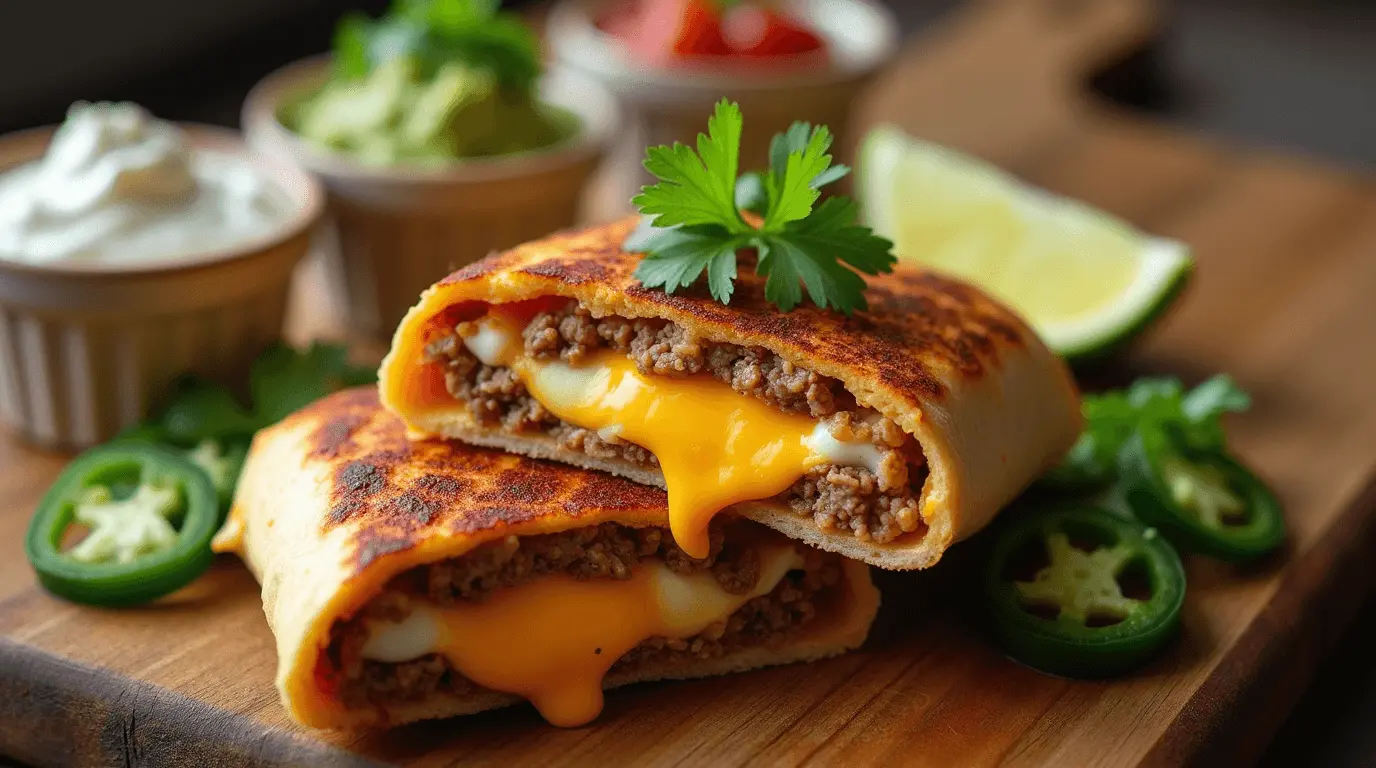
What makes my version special is the double cheese approach – cheese both inside the filling and melted between the tortilla layers. This creates that Instagram-worthy cheese stretch when you take a bite while ensuring cheesy goodness is distributed throughout every mouthful.
If you’re counting calories, don’t worry – I’ll share some lighter alternatives that still deliver on flavor. The beauty of the grilled cheese burrito is its adaptability. Whether you’re craving a breakfast variation, a vegetarian option, or even a steak-filled version (my personal favorite), I’ve got you covered.
Why This Epic Grilled Cheese Burrito Deserves a Spot in Your Recipe Collection
Goal: Let me tell you exactly why this fusion creation needs to become part of your regular cooking rotation!
Perfect Comfort Food Combination: Combines two beloved classics – grilled cheese and burritos – into one extraordinary meal.
Customizable to Your Taste: Endless filling possibilities from classic beans and rice to gourmet steak options.
Budget-Friendly: Use whatever cheese and fillings you have on hand – perfect for using leftovers!
Family-Approved: Even picky eaters love the familiar flavors with an exciting twist.
Great for Any Meal: Works for breakfast, lunch, dinner, or late-night cravings.
Make-Ahead Friendly: Prep components ahead and assemble for a quick meal solution.
Impressive but Easy: Looks like restaurant-quality food with minimal cooking skills required.
Portable Option: Wrap in foil for lunch on-the-go or outdoor gatherings.
Temperature Flexible: Delicious piping hot, warm, or even room temperature.
Crowd-Pleaser: Perfect for game days, casual gatherings, or family dinners.
check out our French Fry Seasoning Blends That Taste Amazing
Ingredients Breakdown + Substitutions for Perfect Grilled Cheese Burritos
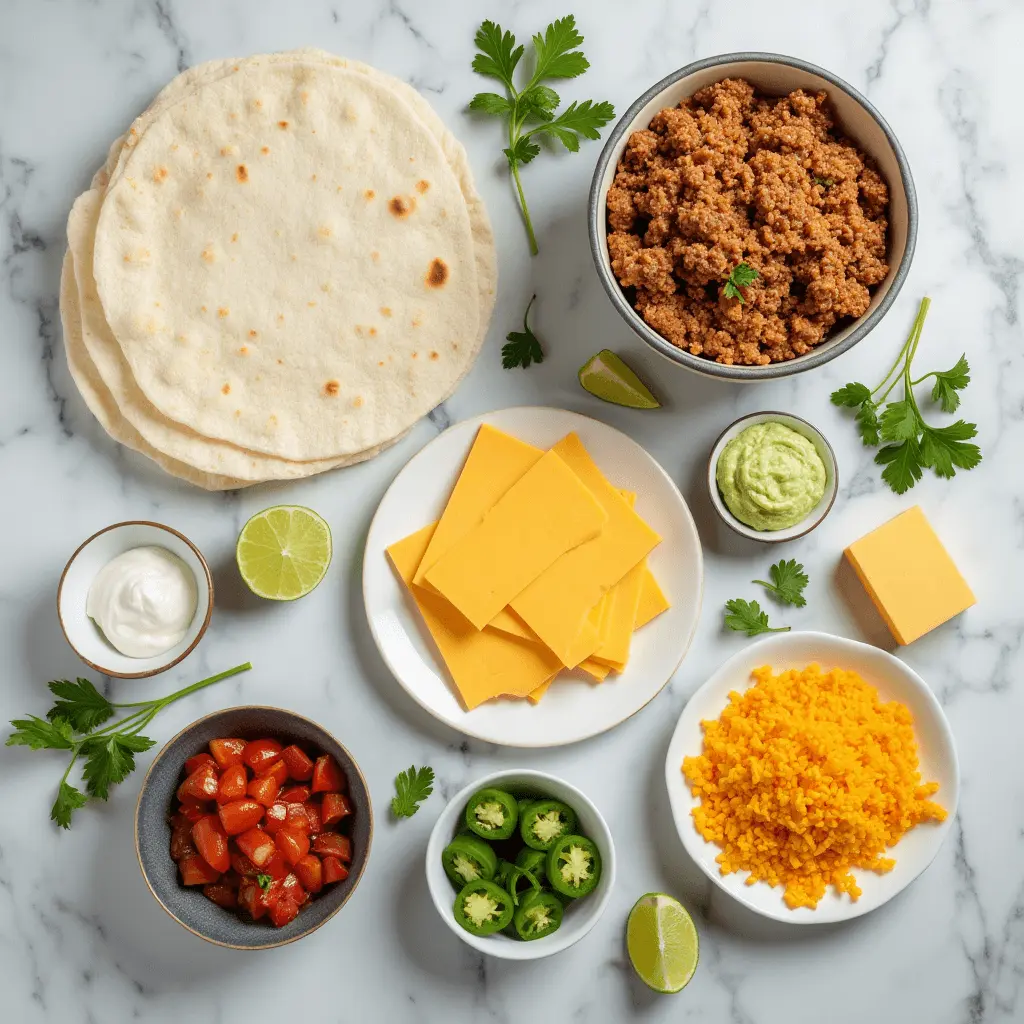
| Ingredient | Why It’s Important | Substitutions |
| Large Flour Tortillas | Creates the sturdy wrapper and gets crispy when grilled | Whole wheat tortillas (healthier), low-carb tortillas (keto), gluten-free tortillas (Mission brand makes excellent GF options available at most grocery stores) |
| Cheddar Cheese | Provides classic grilled cheese flavor and excellent meltability | Pepper jack (spicier option), vegan cheddar-style shreds (Violife or Follow Your Heart brands work best for melting, available at Whole Foods and Sprouts) |
| Monterey Jack Cheese | Creates the perfect cheese pull and mild flavor balance | Mozzarella (milder), Oaxaca cheese (authentic Mexican option), dairy-free mozzarella-style shreds (Daiya melts decently) |
| Butter | Creates the crispy, golden exterior | Olive oil (healthier option), avocado oil (neutral flavor), vegan butter (Earth Balance sticks work well), ghee (lactose-free option) |
| Rice | Adds substance and absorbs flavors | Cauliflower rice (low-carb/keto), quinoa (higher protein), skip entirely for a lighter option |
| Ground Beef/Protein | Provides satisfying protein and flavor base | Ground turkey (leaner), shredded chicken (lighter option), black beans (vegetarian/vegan), Beyond Meat crumbles (plant-based) |
| Sour Cream | Adds creaminess and tanginess | Greek yogurt (higher protein), cashew cream (vegan, made by blending soaked cashews with water), dairy-free sour cream (Forager Project brand is excellent) |
| Salsa/Pico de Gallo | Adds moisture and bright flavors | Roasted salsa verde (tangier option), mango salsa (sweeter variation), enchilada sauce (more complex flavor) |
| Thinly Sliced Steak | Creates an elevated protein experience for steak versions | Seitan strips (vegan), portobello mushrooms (vegetarian), marinated tempeh (plant-based protein) |
| Guacamole/Avocado | Adds creamy richness and healthy fats | Smashed edamame (lower fat), hummus (different flavor profile but adds creaminess) |
| Jalapeños | Brings heat and brightness | Pickled banana peppers (milder), serrano peppers (spicier), green chiles (milder but flavorful) |
| Cilantro | Adds fresh, citrusy flavor | Parsley (milder herb option), scallions (different but complementary flavor), omit entirely for cilantro-averse eaters |
Special Ingredient Notes:
- For authentic Mexican cheeses like Oaxaca or queso quesadilla, check Hispanic grocery stores or the international section of larger supermarkets.
- For plant-based alternatives, natural food stores like Whole Foods and Sprouts offer the best melting vegan cheeses.
- For premium steak options, look for pre-sliced carne asada at Hispanic markets or ask your butcher to thinly slice flank steak against the grain.
- Low-carb tortilla options like Mission Carb Balance are widely available at regular grocery stores.
Step-by-Step Instructions with Expert Tips for the Ultimate Grilled Cheese Burrito
Preparation Phase
- Prepare Your Work Station: Lay out all ingredients in the order you’ll use them. Clear a clean, flat surface for rolling. Pro tip: Having everything ready before you start prevents rushed decisions and ingredient omissions.
- Warm Your Tortillas: Microwave tortillas for 10-15 seconds between damp paper towels or quickly heat on a dry skillet. Heating tortillas makes them more flexible and less likely to break. Troubleshooting: If tortillas still crack, they may be old. Try a fresher package or different brand.
- Pre-Cook Fillings: Ensure all fillings are fully cooked and seasoned. Drain excess moisture from wet ingredients like salsa or beans. Pro tip: For steak grilled cheese burritos, let the meat rest for 5 minutes before slicing to retain juices.
Assembly Process
- Butter the Exterior: Lightly spread softened butter on one side of the tortilla, then flip it over so the butter side faces down on your work surface. Mistake to avoid: Using cold butter will tear the tortilla. Either soften butter first or use spreadable butter.
- Create Your Cheese Base: Sprinkle a thin, even layer of shredded cheese over the entire tortilla. This first layer is critical – it serves as the “glue” that will seal your burrito. Pro tip: Use coarsely shredded cheese rather than finely shredded for better melting properties and texture.
- Add Fillings Strategically: Place warm fillings in a rectangular shape on the bottom third of the tortilla, leaving 1.5 inches empty on all sides. Layer ingredients in order of moisture content – driest items first, wettest last. Crucial mistake to avoid: Overfilling is the #1 reason for burrito failure. Use less than you think you need!
- Add Second Cheese Layer: Place another generous layer of cheese directly on top of your fillings. This creates the perfect cheese pull when eaten. Pro tip: For steak grilled cheese burritos, add a slice of provolone or American cheese on top of the shredded cheese for extra meltiness.
- Master the Perfect Fold: First, fold in both sides of the tortilla toward the center. Then, tightly roll from the bottom edge upward, tucking in the sides as you go. The seam should end up on the bottom. Troubleshooting: If the burrito feels loose, you can secure it with a toothpick during the initial grilling phase.
Grilling Technique
- Preheat Your Pan Properly: Heat a non-stick skillet or well-seasoned cast iron pan over medium heat (not high!). The pan should be hot but not smoking. Pro tip: Test the temperature by sprinkling a few drops of water – they should dance, not immediately evaporate.
- Place Seam-Side Down: Start by placing the burrito seam-side down on the hot surface. Apply gentle pressure with a spatula for the first 30 seconds to seal the seam. Mistake to avoid: Moving the burrito too early can prevent proper sealing. Let it cook undisturbed for 2-3 minutes.
- Monitor Heat and Timing: Cook for 2-3 minutes per side until golden brown and crispy. If browning happens too quickly, lower the heat. Troubleshooting: If cheese isn’t melting but exterior is browning, cover pan with lid for 30 seconds to trap heat.
- Flip with Confidence: Use a wide spatula to completely support the burrito when flipping. Flip in one decisive motion rather than inching it over. Pro tip: For extra crispy results, add a small amount of fresh butter to the pan before flipping.
Finishing Touches
- Rest Before Cutting: Remove from heat and let rest for 2-3 minutes. This crucial step allows cheese to set and prevents filling spillage. Science note: The resting period allows the proteins in the cheese to slightly firm up while remaining stretchy.
- Slice Diagonally: Cut through the center at a 45-degree angle using a sharp knife. Cut in one clean motion rather than sawing back and forth. Presentation tip: For photo-worthy results, wait until you see the cheese begin to pull before lifting the cut piece.
- Serve Immediately: Transfer to a warmed plate and serve with small ramekins of additional toppings like extra salsa, sour cream, or guacamole. Pro tip: For steak grilled cheese burritos, create a simple chipotle aioli by mixing mayo with a teaspoon of adobo sauce from canned chipotles.
Troubleshooting Common Issues
- If your tortilla tears: You may be using too much pressure when grilling or your tortilla may be too dry. Try a different brand or warm them more thoroughly before assembly.
- If cheese isn’t melty: Your fillings may be too cold. Ensure all components are warm before assembly, or microwave the assembled (but ungrilled) burrito for 15-20 seconds before grilling.
- If the exterior burns before cheese melts: Your heat is too high. Use medium-low heat and be patient – the slower cooking process creates the perfect balance of crispy exterior and melty interior.
- If your burrito unravels during cooking: You may need to improve your rolling technique. Practice makes perfect! Meanwhile, you can secure with toothpicks (just remember to remove before eating).
For steak grilled cheese burritos specifically, marinate your steak for at least 30 minutes before cooking. A simple mixture of lime juice, garlic, cumin, and a splash of soy sauce works wonders for enhancing flavor. Cook to medium-rare, then let rest before slicing thinly against the grain for the most tender results.
Storage, Make-Ahead, & Freezing Tips for Grilled Cheese Burritos
Knowing how to properly store, make ahead, and freeze your grilled cheese burritos will help you enjoy this comfort food whenever cravings strike!
Storage Options:
- Refrigerate Assembled (Ungrilled) Burritos: Wrap tightly in parchment paper, then aluminum foil. Store for up to 2 days.
- Refrigerate Grilled Burritos: Allow to cool completely, then wrap in parchment paper and store in an airtight container for up to 3 days.
- Freeze Assembled (Ungrilled) Burritos: Wrap individually in parchment paper, then aluminum foil, and place in a freezer-safe bag. Freeze for up to 1 month. Label with contents and date!
- Freeze Grilled Burritos: Cool completely, wrap in parchment paper and aluminum foil, then place in freezer bags. Freeze for up to 3 weeks.
Best Reheating Methods:
- From Refrigerated (Ungrilled): Remove wrapping and grill in a pan as directed in the original recipe.
- From Refrigerated (Grilled): Heat in a skillet over medium-low heat for 3-4 minutes per side. Cover with a lid for optimal cheese melting.
- From Frozen (Ungrilled): Thaw in refrigerator overnight, then grill as normal.
- From Frozen (Grilled): Thaw in refrigerator, then reheat in a 350°F oven for 10-12 minutes or until heated through and crispy.
- Quick Microwave Method (Emergency Only): Wrap in a paper towel and microwave for 30-second intervals until warm. Note: This sacrifices crispiness!
Creative Leftover Ideas:
- Breakfast Hash: Chop leftover grilled cheese burritos into chunks and crisp in a skillet with eggs.
- Burrito Bowl: Deconstruct and serve over fresh lettuce for a burrito bowl experience.
- Soup Croutons: Cut into cubes and toast in the oven for unique soup toppers.
- Panini Press Revival: If you have a panini press, it works wonderfully for reheating and re-crisping!
Creative Variations & Serving Ideas for Grilled Cheese Burritos
Take your grilled cheese burrito game to the next level with these creative variations and perfect pairings!
Flavor Variations:
- Breakfast Grilled Cheese Burrito: Add scrambled eggs, crispy bacon, and hash browns with maple syrup drizzle.
- Mediterranean Twist: Use feta, spinach, olives, and hummus with a za’atar seasoning.
- Buffalo Chicken Style: Shredded chicken tossed in buffalo sauce with blue cheese crumbles and ranch drizzle.
- Pizza Grilled Cheese Burrito: Pepperoni, mozzarella, marinara sauce, and Italian seasoning.
- Dessert Version: Fill with mascarpone, Nutella, sliced strawberries, and grill with a cinnamon-sugar butter coating.
Global Inspirations:
- Korean BBQ Grilled Cheese Burrito: Bulgogi beef, kimchi, and gochujang mayo.
- Indian Fusion: Paneer cheese, tikka masala sauce, peas, and potatoes.
- Greek Style: Gyro meat, tzatziki, feta, and cucumber.
- Southern Comfort: Pulled pork, mac and cheese, and collard greens.
Perfect Pairings:
- Soup Companions: Tomato bisque, tortilla soup, or black bean soup.
- Side Dishes: Mexican street corn, cilantro-lime slaw, or a simple green salad with lime vinaigrette.
- Beverage Matches:
- Non-Alcoholic: Horchata, Mexican Coca-Cola, or hibiscus tea
- Alcoholic: Modelo beer, michelada, or a spicy margarita
- Coffee Pairing: Cinnamon-spiced cold brew (especially with breakfast variations)
Presentation Ideas:
- Burrito Board: Create a grilled cheese burrito board with various dipping sauces, pickled vegetables, and garnishes.
- Family Style: Make mini versions for sharing and sampling different variations.
- Restaurant Presentation: Slice diagonally, stand cut-sides up, and surround with colorful sauces for an Instagram-worthy plate.
Expert Tips & FAQs for Perfect Grilled Cheese Burritos
Pro Tips from Culinary Experts:
- Cheese Distribution is Key: Keep 70% of cheese inside with fillings and 30% in the outer layer that touches the tortilla for optimal melt and crisping.
- Temperature Management: Cook over medium heat, never high, to allow cheese to melt properly before the tortilla burns.
- Butter Strategy: Use clarified butter or ghee for a higher smoke point and better browning.
- Double Cheese Technique: Use a slice of American cheese or Velveeta among your shredded cheeses for the ultimate creamy melt factor.
- Finishing Touch: Sprinkle a tiny bit of flaky sea salt on the exterior right after grilling for enhanced flavor contrast.
Frequently Asked Questions:
Q: Why does my grilled cheese burrito always leak and fall apart? A: There are three common culprits: 1) Overfilling the burrito, 2) Not sealing the edges properly, or 3) Flipping too early. Make sure to fold in the sides first, roll tightly, and start cooking with the seam side down for at least 2 minutes before flipping to properly seal the burrito.
Q: How can I make a grilled cheese burrito healthier without sacrificing flavor? A: Focus on strategic cheese placement rather than quantity. Use a thin layer spread throughout rather than piling it all in one spot. Incorporate plenty of vegetables, choose whole grain tortillas, and use cooking spray instead of butter. Adding herbs and spices boosts flavor without calories.
Q: My cheese isn’t melting before my tortilla gets too brown. What am I doing wrong? A: Your heat is likely too high. Start with room temperature cheese (not straight from the refrigerator), use medium-low heat, and cover the pan for 30-60 seconds to create steam that helps melt the cheese without over-browning the tortilla.
Q: Can I make grilled cheese burritos for a crowd? A: Yes! Assemble all burritos first, then grill in batches. Keep finished ones warm in a 200°F oven on a wire rack over a baking sheet (to maintain crispiness). For very large groups, consider using an electric griddle that can cook multiple burritos simultaneously.
Q: How do I get that perfect crispy exterior without burning? A: The secret is patience and proper fat distribution. Use softened butter spread thinly and evenly. Cook over medium heat and resist the urge to increase the temperature. For extra crispiness, add a sprinkle of finely grated Parmesan to the exterior butter layer before grilling.
Conclusion
There you have it – the ultimate guide to creating that perfect, crave-worthy grilled cheese burrito that combines the best of two comfort food classics! From mastering the basic technique to exploring creative variations like the indulgent steak grilled cheese burrito, you now have all the tools to create this epic fusion dish in your own kitchen.
What makes this recipe special is its versatility and ability to transform simple ingredients into something extraordinary. Whether you’re counting grilled cheese burrito calories for a lighter version or going all-in with the deluxe steak variation, the fundamental techniques remain the same – creating that perfect crispy exterior with a gloriously melty interior.
I’d love to know – what filling combination are you most excited to try in your grilled cheese burrito? Are you team traditional beef and beans, or are you adventurous enough to try one of the global fusion variations? Drop a comment below and share your creation!
If you enjoyed this fusion comfort food recipe, you’ll love my other creative crossovers – check out my “Philly Cheesesteak Egg Rolls” or “Mac and Cheese Waffle Sandwiches” next for more delicious food mashups!
Don’t forget to save this recipe for your next comfort food craving. Pin it, share it, and tag me in your creations on Instagram using #GrilledCheeseBurritoMaster. And if you want more fusion recipe inspiration delivered straight to your inbox, subscribe to my newsletter for weekly comfort food magic!
Happy grilling, cheese pulling, and burrito enjoying, friends!