

Table of Contents
You know that moment when you’re craving something sweet, but the thought of turning on the oven makes you want to run for the hills? Been there! Growing up in my mom’s kitchen, peanut butter rice crispy treats were our ultimate no-bake savior on hot summer days when we wanted something delicious without heating up the house.
I’ll never forget the first time I made these gooey, crunchy peanut butter rice crispy treats for my kids’ bake sale. They were gone within minutes! People kept asking, “What makes these so much better than regular rice crispy treats?” The secret? That creamy, nutty swirl of peanut butter and honey transforms an everyday treat into something truly crave-worthy.
After countless batches and tweaking the recipe over the years, I’ve perfected these peanut butter rice crispy treats to achieve that perfect balance of chewy and crispy textures. Unlike store-bought versions that can taste stale or overly sweet, these homemade peanut butter rice crispy treats stay fresh for days (if they last that long!) and have that ideal peanut butter flavor that’s not overwhelming but definitely noticeable.
Whether you’re looking for a quick dessert for unexpected guests, a fun cooking activity with kids, or just satisfying your own sweet tooth, these peanut butter rice crispy treats are about to become your new go-to no-bake treat!
Why This Recipe Is a Must-Try
- Super Quick & Easy: Ready in just 15 minutes of active time perfect for last-minute rice krispy treats or when the kids are begging for something sweet!
- No-Bake Wonder: Beat the heat with these delicious peanut butter rice crispy treats that don’t require turning on the oven.
- Kid-Friendly Kitchen Project: Simple enough that kids can help make them (with supervision for the stovetop part).
- Perfectly Balanced Texture: Not too sticky, not too hard these peanut butter rice crispy treats have the ideal chewy-yet-crispy consistency.
- Budget-Friendly: Uses simple pantry staples that won’t break the bank.
- Crowd-Pleaser: I’ve never met anyone who doesn’t love these peanut butter rice crispy treats they’re always the first to disappear at potlucks!
- Customizable: Easy to dress up with chocolate drizzle, mini chocolate chips, or extra mix-ins (I’ll share my favorite variations below).
- Portable Perfection: These rice krispie treats are great for on-the-go snacks. These peanut butter rice crispy treats hold their shape well, making them ideal for lunchboxes, picnics, and road trips.
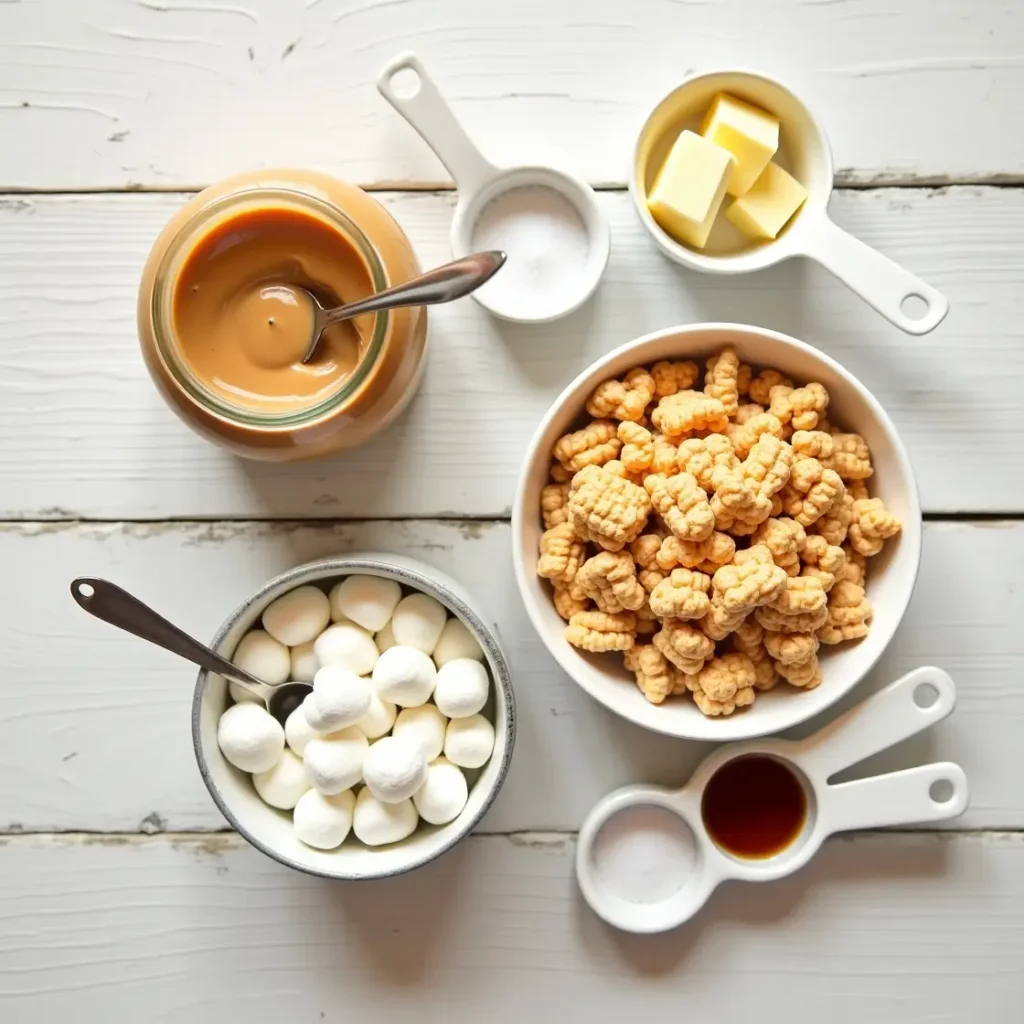
Ingredients Breakdown & Substitutions
| Ingredient | Why It’s Important | Substitutions |
| Rice Krispies cereal | Creates the signature crunch and texture | Any crispy rice cereal works; can use gluten-free varieties if needed |
| Peanut Butter | Adds rich, nutty flavor and helps bind everything together | Almond butter, sunflower seed butter (for nut-free version), or even cookie butter for a different flavor profile |
| Marshmallows | Creates the sticky, chewy texture that holds everything together | Vegan marshmallows work great for a plant-based version; can also use marshmallow fluff (use about 7oz) |
| Butter | Helps melt the marshmallows smoothly and adds richness | Coconut oil, vegan butter, or even ghee will work |
| Vanilla Extract | Enhances all the flavors and adds depth | Almond extract for a different twist, or omit if you don’t have any in your peanut butter rice krispie treat recipe. |
| Salt | Balances the sweetness and enhances the nut butter flavor in your rice krispie treat recipe. | Any salt works, but flaky sea salt gives a gourmet touch to your peanut butter rice krispy treats. |
| Optional: Mini Chocolate Chips | Adds delicious chocolate flavor that pairs perfectly with peanut butter | Chopped chocolate bars, chocolate chunks, or even butterscotch chips can be added to your peanut butter rice krispie treat. |
Step-by-Step Instructions with Expert Tips
Prep Time: 15 minutes | Setting Time: 1 hour | Total Time: 1 hour 15 minutes
Let me walk you through making these irresistible peanut butter rice crispy treats step-by-step. I’ve made these countless times, and these tips will ensure yours turn out perfect every single time!
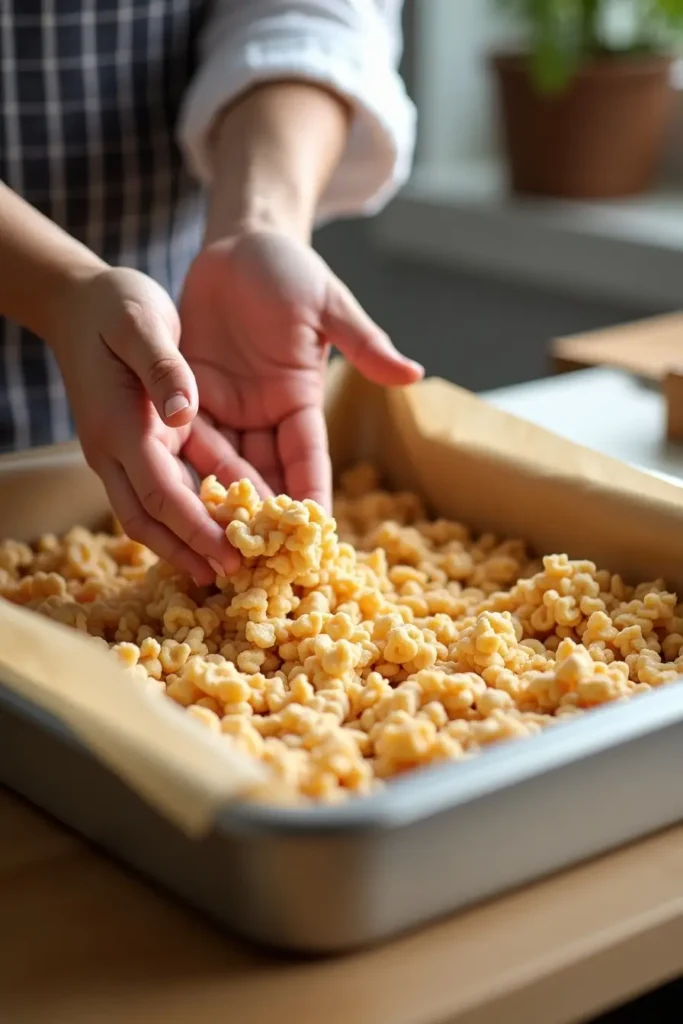
Prepare Your Pan: Lightly grease a 9×13 inch baking pan with butter or line it with parchment paper (leave some overhang on the sides for easy removal). Pro tip: Spraying your spatula with non-stick spray prevents the marshmallow mixture from sticking when you spread it.
Measure Ingredients: Measure out 6 cups of rice crispy cereal into a large bowl and set aside. Having everything measured and ready to go makes the process much smoother since the marshmallow mixture sets quickly, especially when using a rice crispy treats recipe. If your cereal has been open for a while, give it a quick check to make sure it’s still crispy. Stale cereal will make for sad treats!
Melt the Base: In a large pot over medium-low heat, melt 4 tablespoons of butter. Watch carefully to prevent burning! Once melted, add ¾ cup of creamy peanut butter and stir until completely smooth and combined. Use a silicone spatula for easy stirring and scraping the sides of the pot.
Add Marshmallows: Reduce heat to low and add 10 oz of mini marshmallows (about 4 cups). Stir constantly until the marshmallows are completely melted and the mixture is smooth. This should take 3-4 minutes. Troubleshooting tip: If you notice any scorching, immediately remove from heat and continue stirring. Burned marshmallows will ruin the flavor of your treats, making it essential to follow the rice crispy treats recipe carefully.
Rice krispie treat Add Flavoring: Remove the pot from heat and stir in 1 teaspoon of vanilla extract and ¼ teaspoon of salt. The vanilla enhances all the flavors while the salt balances the sweetness and makes the peanut butter flavor pop! For a flavor twist, try adding ½ teaspoon of cinnamon or a tablespoon of honey.
Combine With Cereal: Working quickly, pour the marshmallow mixture over the cereal and gently fold everything together until all the cereal is evenly coated. If the mixture seems too thick or hard to stir, don’t panic! If your mixture becomes too stiff to stir, add 1-2 tablespoons of butter to help loosen it up.
Press Into Pan: Transfer the mixture to your prepared pan and press down gently but firmly to create an even layer. Don’t pack it too tightly, or your peanut butter rice crispy treats will end up too dense and hard. Expert tip: Use a piece of wax paper or plastic wrap between your hand and the mixture to prevent sticking when pressing into the pan.
Optional step: If adding chocolate chips, wait about 5 minutes for the mixture to cool slightly before sprinkling ½ cup mini chocolate chips on top and pressing them gently into the surface. If the mixture is too hot, they’ll melt completely instead of maintaining their shape.
Rice krispies Let Set: Allow the peanut butter rice crispy treats to cool and set at room temperature for about 1 hour. Don’t try to rush this by putting them in the refrigerator they can become too hard and lose that perfect chewy texture!
Cut and Serve: Once set, lift the treats out of the pan using the parchment paper overhang (if used) and transfer to a cutting board. Cut into 16-20 squares or bars using a sharp knife. For cleaner cuts, wipe your knife with a damp cloth between slices.
Storage, Make-Ahead, & Freezing Tips
These peanut butter rice crispy treats are perfect for making ahead! Here’s how to keep peanut butter rice krispy treats fresh and delicious:
Storage Duration:
- Room Temperature: Store in an airtight container for 3-4 days. Place pieces of wax paper between layers to prevent sticking.
- Refrigerator: Keep for up to 1 week in an airtight container. Bring peanut butter rice krispy treats to room temperature before serving for the best texture.
- Freezer: Freeze for up to 3 months! Wrap individual pieces tightly in plastic wrap, then place in a freezer bag.
Best Storage Practices:
- Don’t expose peanut butter rice krispy treats to heat or humidity: These peanut butter rice krispie treats can get sticky and lose their crispness in humid environments, making them less enjoyable.
- Cut before storing: It’s easier to cut them when fresh rather than after they’ve been refrigerated or frozen.
- Use parchment paper between layers: This prevents them from sticking together when stacked.
Reheating Tips:
- If your peanut butter rice krispy treats have hardened slightly, microwave individual pieces for 5-10 seconds to restore that fresh-made softness. Don’t overdo it, or the marshmallows will melt!
Creative Uses for Leftovers:
- Ice Cream Topping: Peanut butter cup ice cream topping pairs wonderfully with krispy treats! Crumble leftover treats over vanilla ice cream for an amazing dessert.
- Milkshake Mix-In: Blend chunks of peanut butter rice crispy treats into a vanilla milkshake.
- Parfait Layers: Create dessert parfaits by layering crumbled treats with yogurt and sliced bananas.
- Dessert Crust: Crush them up and use as a no-bake pie crust for a chocolate pudding pie made with peanut butter rice krispies!
Creative Variations & Serving Ideas
Delicious Variations:
- Chocolate-Dipped Bliss: A delicious variation of a rice krispie treat. Once set, dip half of each peanut butter rice crispy treat into melted chocolate and sprinkle with sea salt for a gourmet touch, adding peanut butter for extra richness.
- Double Peanut Butter: Mix ½ cup of chopped peanuts into the cereal before adding the marshmallow mixture for extra peanutty crunch.
- S’mores Style: Fold in ½ cup mini marshmallows and ½ cup chocolate chunks after the mixture has cooled slightly for pockets of gooey goodness.
- Nutella Swirl: Peanut butter rice krispy treats with a Nutella swirl are a delicious combination! After pressing the mixture into the pan, warm 3 tablespoons of Nutella in the microwave for 20 seconds and swirl it into the top of the treats.
- Banana Lovers: Mix in ½ cup dried banana chips for a peanut butter banana flavor combo that’s out of this world!
- Coconut Paradise: Add ½ cup toasted coconut flakes to the mixture for tropical-inspired healthy rice krispie treats.
- Birthday Cake Version: Fold in ¼ cup colorful sprinkles and use white chocolate drizzle on top for a festive touch.
Perfect Pairings:
- Beverages: These peanut butter rice crispy treats are perfect with an ice-cold glass of milk, a hot cup of coffee, or even a scoop of vanilla ice cream on the side, especially when made with brown rice syrup.
- Dessert Board: Create a stunning dessert board by cutting the treats into small squares and arranging them with fresh fruit, chocolate-dipped pretzels, and cookies.
- Lunchbox Star: Pack a square alongside apple slices and a cheese stick for a school lunch that will make your kids the envy of the cafeteria.
- Movie Night: Serve alongside a homemade hot cocoa bar for the perfect movie night treat!
Nutrition Value
Looking for a sweet treat that won’t completely derail your nutrition goals? Let’s break down what you’re getting in each of these delicious peanut butter rice crispy treats:
| Nutrition Facts (per serving) | Amount |
| Calories | 175 |
| Macronutrients | |
| Protein | 3g |
| Carbohydrates | 26g |
| Fat | 7g (2.5g saturated) |
| Fiber | 0.5g |
| Sugar is a key ingredient in classic rice krispies treats. | 13g |
| Key Micronutrients | |
| Iron | 4% DV |
| Calcium | 2% DV |
| Vitamin E | 6% DV (from peanut butter) can be enhanced by using cashew butter for a different flavor profile. |
Serving size: 1 square (when cut into 16 pieces from a 9×13 pan of rice krispy treats)
Nutrition values calculated using the USDA Food Database and standard ingredient nutrition information. Values are approximate and may vary based on specific brands used.
Dietary Considerations:
- These peanut butter rice crispy treats can be made gluten-free by using certified gluten-free rice crispy cereal or rice crisps for a gluten-free option.
- For a dairy-free/vegan version, substitute the butter with coconut oil and use vegan marshmallows to make this recipe suitable for everyone.
- Not suitable for keto or low-carb diets due to the carbohydrate content.
- Allergy alert: Contains peanuts unless substituted with sunflower seed butter.
While these treats aren’t exactly health food, they’re a much better option than many store-bought desserts! The addition of peanut butter does add some protein and healthy fats, making these peanut butter rice crispy treats slightly more satisfying than the original version.
Expert Tips & FAQs
After years of perfecting peanut butter rice crispy treats, I’ve gathered some insider knowledge to help you achieve no-fail results every time:
Expert Tips for Success:
- Use fresh marshmallows: Older marshmallows can harden and won’t melt as smoothly, affecting your rice krispies treat.
- Don’t crank up the heat: Patience is key! Low heat prevents scorching and gives you that perfect gooey texture.
- Use natural peanut butter with caution: While it works, it can make your treats oilier stick with traditional creamy peanut butter for best results.
- The bowl matters for making the perfect rice krispie treat. Use a bowl much larger than you think you need for easier mixing without spills.
- Act fast: Have everything ready to go before melting, as the mixture sets quickly once removed from heat.
Frequently Asked Questions:
Why are my peanut butter rice crispy treats too hard?
This usually happens when the mixture is packed too tightly into the pan or when the marshmallows are overcooked. Remember to press gently when forming the rice krispy treats and keep the heat low when melting the marshmallows. Also, storing them in the refrigerator can make them harder room temperature storage is best for the perfect texture!
Can I use crunchy peanut butter instead of creamy?
Absolutely! Crunchy peanut butter works great if you want extra texture in your peanut butter rice crispy treats. You might need to add an extra tablespoon of butter to maintain the right consistency since crunchy peanut butter is typically thicker.
My treats aren’t holding together well. What went wrong?
This usually means there’s not enough “glue” (marshmallow mixture) to hold the cereal together. Make sure you’re using the correct ratio of marshmallows to cereal. Another possibility is that you didn’t work quickly enough, and the mixture started to set before it was fully incorporated with the rice krispies.
How do I prevent my treats from sticking to everything?
The marshmallow mixture is sticky by nature, especially when making rice krispies. Use butter or non-stick cooking spray on your spatula, the pan, and even on your hands or the wax paper when pressing the mixture into the pan. A light coating of cooking spray on your knife also helps when cutting the finished peanut butter rice krispie treats.
Can I make these peanut butter rice crispy treats without marshmallows?
While marshmallows create that classic chewy texture, you can substitute them with a mixture of honey (⅓ cup) and more peanut butter (an extra ¼ cup), heated together until smooth. The texture will be different, but still delicious!
Conclusion & Call to Action
There you have it everything you need to know to make the most amazing peanut butter rice crispy treats that’ll have everyone begging for the recipe! These treats have been my family’s go-to for years, and I’m so excited for them to become part of your recipe collection too.
What I love most about these peanut butter rice crispy treats is how they combine nostalgia with an upgrade that makes them special. They’re still quick and easy like the original rice krispie treats, but that creamy peanut butter transforms them into something truly crave-worthy.
Have you tried making peanut butter rice crispy treats before? I’d love to hear about your favorite mix-ins or variations! Drop a comment below and share your experiences with this rice crispy treats recipe I always get the best ideas from you guys!
If you enjoyed this recipe, you might also love my Peanut Butter Cream Cheese Frosting recipe and my Fruity Pebble Rice Crispy Treats: Easy, Colorful & Delicious! . They all share that same quick-and-easy spirit with major flavor payoff!
Don’t forget to save this recipe to your dessert board on Pinterest @tidbitrecipe, and tag me in your creations if you share them on social media. I absolutely love seeing your kitchen successes!
Happy no-baking, friends!