

Table of Contents
Introduction
The day I finally pulled a golden loaf of gluten free sourdough bread from my oven was nothing short of magical. After countless failed attempts – dense bricks, gummy centers, and crusts that could chip a tooth – that perfect first bite with its crispy exterior and soft, airy crumb brought tears to my eyes. For anyone who’s had to give up traditional bread due to gluten intolerance, you understand this moment wasn’t just about food – it was about reclaiming a part of life that seemed lost forever.
Creating truly delicious gluten free sourdough bread has been the holy grail for home bakers since giving up gluten became a necessity for so many. That distinctive tangy flavor, the satisfying chew, and the beautiful open crumb structure of classic sourdough seems impossible to achieve without the stretchy protein networks that only gluten can create. I spent years testing different flour combinations, hydration levels, and techniques before unlocking the secrets I’m about to share with you.
This isn’t just another gluten free sourdough bread bread recipe that produces something “good enough” or “not bad for gluten free.” This is authentic sourdough bread that happens to be gluten free – with that classic tangy flavor, beautiful rise, and perfect texture that rivals what you’d find at artisanal bakeries. Friends who can eat regular bread have been fooled by this loaf!
What makes this gluten free sourdough bread recipe different is that it doesn’t try to mimic wheat-based methods exactly. Instead, it works with the unique properties of gluten-free flours to achieve similar results through different techniques. I’ve developed specific approaches to creating and maintaining a gluten free sourdough bread starter that’s just as active and flavorful as traditional wheat starters.
Whether you’re newly diagnosed with celiac disease, managing non-celiac gluten sensitivity, or baking for someone who can’t consume gluten, this recipe will revolutionize your relationship with bread. The health benefits extend beyond just being gluten-free – this sourdough method makes the bread more digestible and nutritious through the natural fermentation process, just like traditional sourdough.
Why This Recipe Is a Must Try
✓ Authentic Sourdough Flavor: Achieve that distinctive tangy flavor you thought was impossible in gluten free bread.
✓ Perfect Texture & Crumb: No more dense, crumbly gluten free sourdough bread! This recipe creates soft, chewy bread with those beautiful air pockets.
✓ Digestibility: The long fermentation process makes this bread easier to digest than quick gluten free recipes.
✓ Better Nutrition: Fermentation increases nutrient availability and reduces anti-nutrients in the gluten free flours.
✓ Extended Freshness: Unlike store-bought gluten free sourdough bread that turns to sawdust within hours, this bread stays fresh for days.
✓ Cost-Effective: Save money by making your own delicious gluten free sourdough bread instead of paying premium prices for mediocre store options.
✓ Customizable: Once you learn the technique, you can adapt it to create rolls, focaccia, or even pizza crust!
✓ No Gums Required: Many commercial gluten free breads rely heavily on xanthan gum, but this recipe requires minimal or no gums.
✓ Simple Ingredients: No artificial preservatives or additives you can’t pronounce.
✓ Foolproof Method: The detailed instructions ensure success even for first-time sourdough bakers.
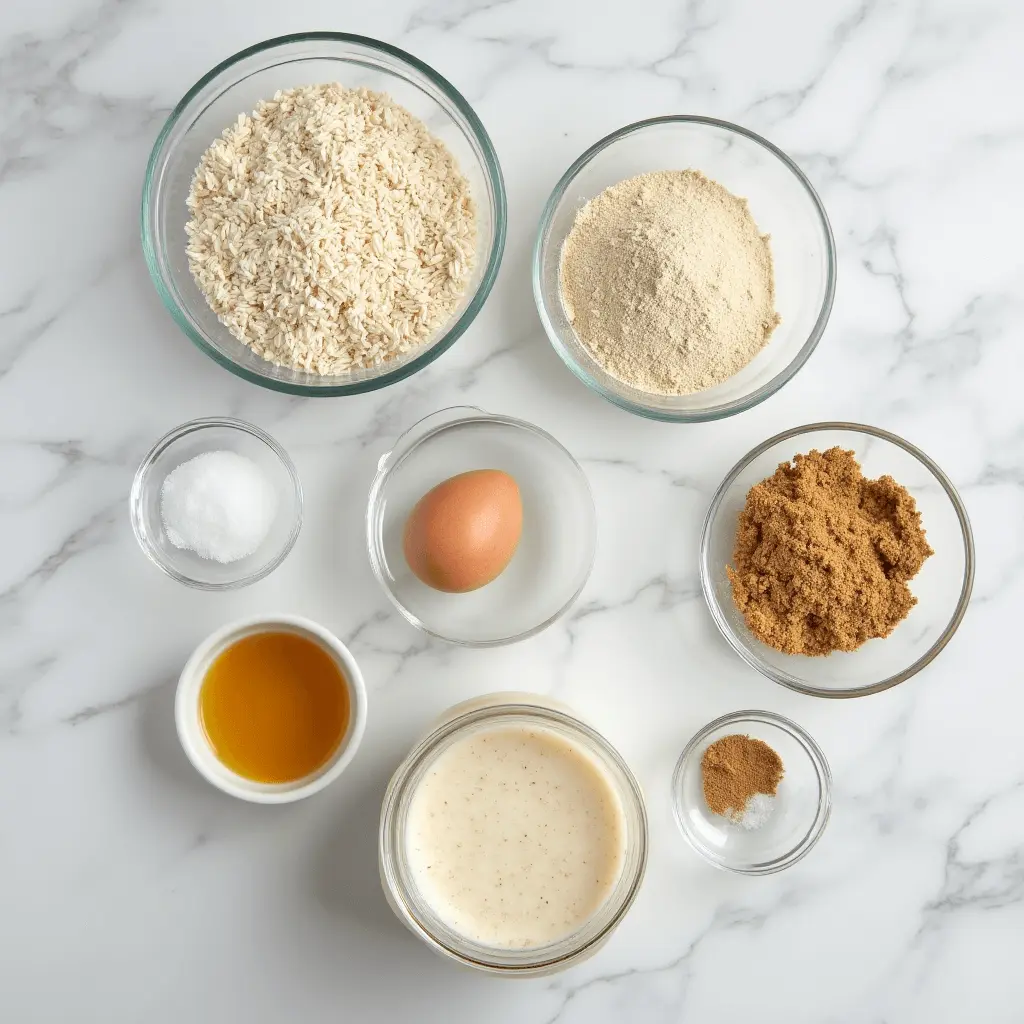
Ingredients Breakdown & Substitutions
The Gluten Free Sourdough bread Starter
Active Gluten Free Starter Why It’s Important: Your starter is the heart and soul of sourdough bread, providing natural leavening and that distinctive tangy flavor through fermentation. Substitutions: While you’ll need to create a gluten free starter (instructions below), you can use different flour combinations like brown rice flour, sorghum flour, or buckwheat flour as the base.
The Flour Blend
Brown Rice Flour Why It’s Important: Creates structure and provides a neutral flavor base without being too heavy. Substitutions: White rice flour (will create a lighter loaf) or sorghum flour (adds a slightly sweeter flavor).
Tapioca Starch Why It’s Important: Provides elasticity and chewiness that gluten-free breads often lack. Substitutions: Potato starch or arrowroot starch will work similarly, though each brings slight differences in texture.
Psyllium Husk Powder Why It’s Important: The secret weapon! Acts similarly to gluten by creating an elastic network that traps air bubbles. Substitutions: Whole psyllium husks can be used but must be ground finely. No true substitute exists, as this is essential for structure.
Sorghum Flour Why It’s Important: Adds a mild sweetness and helps create a more diverse nutrient profile. Substitutions: Millet flour or amaranth flour can provide similar benefits with slightly different flavor profiles.
Additional Ingredients for gluten free sourdough bread
Salt Why It’s Important: Beyond flavor, salt helps control fermentation rate and strengthens the psyllium network. Substitutions: Any fine sea salt works well. Reduce by 25% if using table salt due to its higher density.
Water Why It’s Important: Hydration is crucial for proper fermentation and texture. Substitutions: Filtered water is best. If your tap water is heavily chlorinated, let it sit out overnight before using.
Apple Cider Vinegar Why It’s Important: Helps create a more acidic environment that improves rise and flavor. Substitutions: White vinegar or lemon juice will provide similar acidity.
Olive Oil Why It’s Important: Adds softness and helps extend shelf life. Substitutions: Any neutral oil like avocado oil works well. For dairy-tolerant individuals, melted butter adds wonderful flavor.
Optional: Seeds and Grains Why They’re Important: Add texture, flavor, and nutritional benefits. Suggestions: Sunflower seeds, pumpkin seeds, flaxseeds, or chia seeds make excellent additions to the dough or as toppings.
Finding high-quality gluten free flours is essential for success. Look for certified gluten-free products to avoid cross-contamination if you have celiac disease. Bob’s Red Mill, King Arthur, and Anthony’s are reliable brands available in most grocery stores or online. For the freshest ingredients, consider ordering from specialty online retailers like Vitacost or Thrive Market, especially for items like psyllium husk powder which might be harder to find locally.
Step-by-Step Instructions with Expert Tips for gluten free sourdough bread
Creating Your gluten free sourdough bread Starter
- Mix the Base Flour: Combine 50g brown rice flour and 50g sorghum flour in a clean glass jar. Using two different flours provides more diverse food sources for the wild yeast and bacteria.
- Add Water: Pour in 100g of filtered, room-temperature water and stir thoroughly until no dry spots remain. The texture should resemble a thick pancake batter.
- Cover Loosely: Place a coffee filter or clean kitchen towel over the jar and secure with a rubber band. This promotes airflow while preventing contamination.
- Find a Warm Spot: Place your starter in a warm area of your kitchen (75-80°F is ideal). The top of your refrigerator or near (not on) a warm appliance works well.
- Feed Daily: For the next 7-10 days, discard all but 50g of starter and feed with 50g mixed flour and 50g water. Always stir until completely combined. Consistency in feeding times helps establish a healthy culture.
- Monitor Activity: Your starter is ready when it reliably doubles in size within 4-6 hours after feeding and has a pleasant, tangy smell. If you see mold or detect a foul odor, discard and start again.
Troubleshooting Tip: If after 5 days your starter shows little activity, try adding a tablespoon of plain yogurt or a few organic grapes to introduce more beneficial bacteria.
Making The Perfect Gluten Free Sourdough Bread
Day 1: Building the Levain and Preparing the Dough
- Create the Levain: In a medium bowl, mix 50g active starter with 100g of your gluten-free flour blend and 100g water. Cover and let ferment for 4-6 hours until bubbly and active. This pre-ferment builds flavor and strength before making the full dough.
- Mix Dry Ingredients: In a large bowl, thoroughly combine 300g brown rice flour, 100g tapioca starch, 50g sorghum flour, and 20g psyllium husk powder. Whisking these ingredients ensures even distribution of the psyllium, which is crucial for structure.
- Add Salt: Mix in 10g sea salt. Distribute it evenly throughout the dry ingredients. Salt inhibits yeast activity, so proper distribution prevents uneven fermentation.gluten free sourdough bread
- Combine Wet Ingredients: In a separate bowl, mix all the levain, 350g water, 15g olive oil, and 10g apple cider vinegar. Water temperature should be around 80-85°F for optimal yeast activity.
- Form the Dough: Pour the wet ingredients into the dry mixture. Stir vigorously with a wooden spoon for 1-2 minutes until well combined. The dough will seem very wet at first but will firm up as the psyllium absorbs moisture.
- Let the Dough Rest: Cover the bowl with a damp cloth and allow it to sit for 30 minutes.
- This allows the psyllium to fully hydrate and begin creating structure.
- Strengthen the Dough: Instead of traditional kneading, use the “stretch and fold” technique. With wet hands, grab one side of the dough, stretch it up, and fold it over the center. Rotate the bowl and repeat 4-6 times. The dough won’t feel like wheat dough, but it should become smoother and more cohesive.
- Bulk Fermentation: Cover the bowl and let the dough rise at room temperature (75-78°F) for 4-6 hours, performing stretch and folds every 30 minutes for the first 2 hours. The dough is ready when it has increased in size by about 50% and has a slightly domed surface with visible bubbles.
Troubleshooting Tip: If your kitchen is cold, place the bowl in a turned-off oven with the light on to maintain a warm environment.
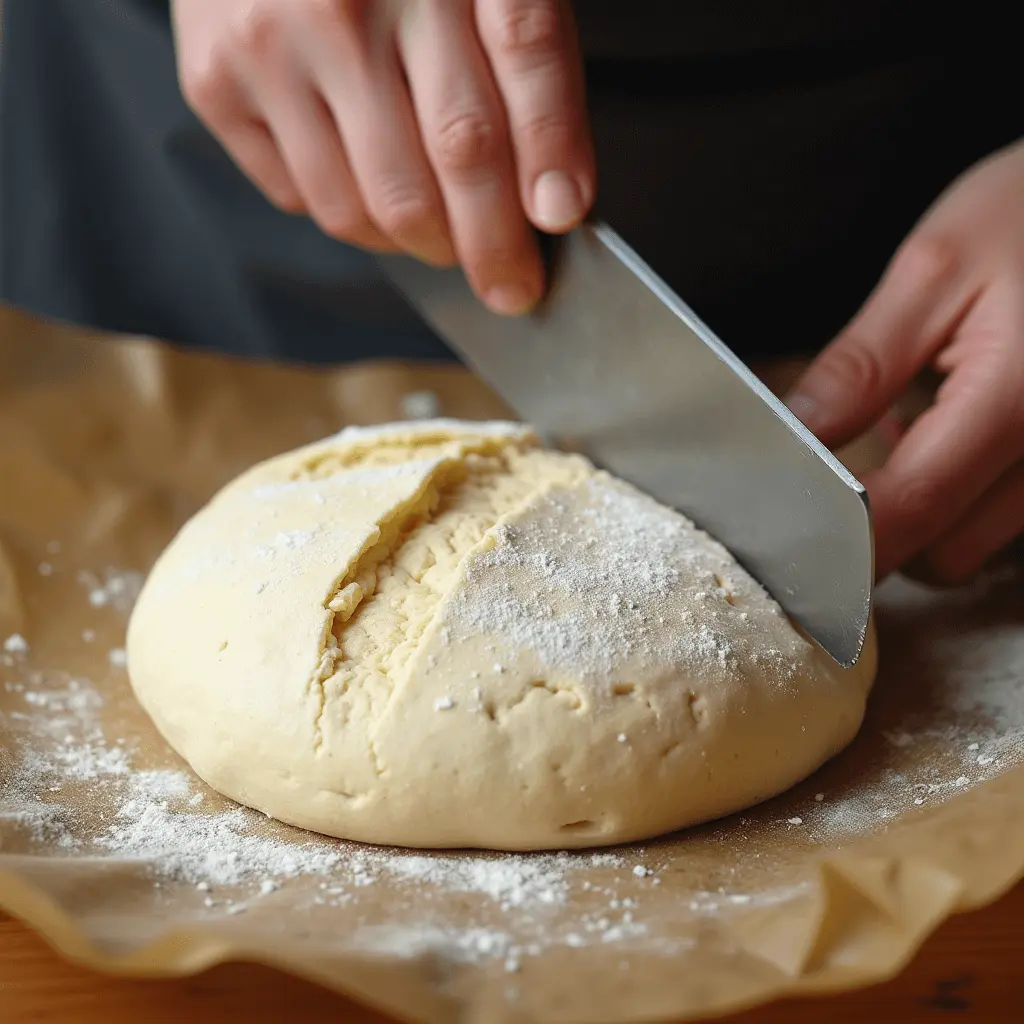
Day 2: Shaping and Baking gluten free sourdough bread
- Prepare the Banneton: Dust a banneton basket (or a bowl lined with a clean kitchen towel) very generously with rice flour. Gluten-free sourdough tends to be stickier, so be more liberal with flour than you might with wheat bread. This step is especially important when working with Gluten Free Sourdough Bread to ensure a smooth release.
- Shape the Loaf: Turn the dough onto a well-floured surface. With wet hands, gently shape it into a round by pulling the edges toward the center to create tension on the surface. Handle with care to maintain the air bubbles that have developed. The dough will be softer than wheat dough, so handle with care. Gluten Free Sourdough Bread requires a delicate touch to preserve its airy texture.
- Transfer to Banneton: Place the shaped dough seam-side up in your prepared banneton. Dust the exposed bottom with more rice flour to prevent sticking. Any excess flour can be brushed off before baking.
- Cold Fermentation: Cover the banneton with a plastic bag and refrigerate for 12-24 hours. This slow fermentation develops complex flavors and improves the bread’s texture. The long fermentation process is what gives Gluten Free Sourdough Bread its signature depth of flavor.
Storage, Make-Ahead, & Freezing Tips for gluten free sourdough bread
Fresh Storage for gluten free sourdough bread
- Day of Baking: Once completely cooled, store your gluten free sourdough bread with the cut side down on a cutting board, covered with a clean kitchen towel. This preserves the crispy crust while protecting the interior from drying out.
- Short-Term Storage (2-3 days): Wrap the loaf in a clean kitchen towel and place in a paper bag. The towel absorbs excess moisture while the paper bag allows enough airflow to maintain crust integrity.
- Maintaining Freshness: Refresh slightly stale bread by spritzing it with water and heating in a 350°F oven for 5-10 minutes. This revives the crust and makes the bread taste freshly baked.
Freezing Your gluten free sourdough bread
- Whole Loaf: Allow the bread to cool completely, then wrap tightly in plastic wrap followed by aluminum foil or place in a freezer bag. Squeeze out as much air as possible before sealing. Double-wrapping prevents freezer burn and preserves flavor.
- Pre-Sliced Freezing: For convenience, slice the cooled bread, place parchment paper between slices, and store in a freezer bag. This allows you to remove only what you need without thawing the entire loaf.
- Freezer Duration: Properly stored gluten free sourdough bread maintains quality for up to 3 months in the freezer.
Thawing and Reheating gluten free sourdough bread
- Room Temperature Thaw: For the best texture, thaw frozen bread at room temperature for about 2 hours. Avoid microwaving to thaw as it can make the bread gummy.
- Toasting: Slices can go directly from freezer to toaster for a quick breakfast option. Use a lower setting than you would for regular bread. This prevents burning the outside while ensuring the inside thaws properly.
- Refreshing Thawed Bread: To restore that fresh-baked quality, lightly spritz thawed bread with water and bake at 350°F for 5-8 minutes. This reactivates the crust and gives the bread a delightful warmth.
Creative Uses for Leftover Bread
- Gluten Free Breadcrumbs: Cube any stale bread, dry in a low oven (250°F) until completely dry, then pulse in a food processor. These homemade breadcrumbs can be seasoned and used for coating chicken, topping casseroles, or making meatballs.
- Croutons: Cut leftover bread into cubes, toss with olive oil and herbs, and bake at 375°F until golden and crispy. Turn occasionally for even browning. These are perfect for soups and salads.
- Bread Pudding: Create a gluten free bread pudding by soaking cubes in a mixture of eggs, dairy-free milk, vanilla, and sweetener before baking. The sturdy texture of sourdough makes it perfect for this classic comfort dessert.
Creative Variations & Serving Ideas for gluten free sourdough bread
Once you’ve mastered the basic gluten free sourdough bread recipe, it’s time to get creative! Here are some delicious variations and serving suggestions that will take your bread to the next level:
Flavor Variations for gluten free sourdough bread
- Seeded Crust Sourdough – Before baking, brush the top of your scored dough with water and sprinkle a mixture of flaxseeds, sesame seeds, and sunflower seeds for a nutritional boost and delightful crunch.
- Rosemary Olive Loaf – Fold in 1/4 cup chopped kalamata olives and 2 tablespoons fresh rosemary into the dough during the final stretch and fold. This Mediterranean-inspired variation pairs beautifully with soups and stews.
- Cinnamon Raisin Swirl – After the bulk fermentation, roll out the dough, sprinkle with cinnamon, coconut sugar, and raisins before shaping into a loaf. This makes extraordinary toast for breakfast!
- Garlic Herb Bread – Add 2 tablespoons of dried Italian herbs and 3 cloves of minced garlic to your dough for a savory bread that’s perfect alongside pasta dishes.
- Jalapeño Cheddar – For those who can tolerate dairy, fold in 1/2 cup dairy-free cheddar-style shreds and 2 tablespoons diced jalapeños for a spicy, “cheesy” treat.
Serving Suggestions for gluten free sourdough bread
- Avocado Toast – Toasted gluten free sourdough bread topped with smashed avocado, a sprinkle of red pepper flakes, and a squeeze of lemon makes the perfect breakfast or lunch.
- French Toast – The sturdy texture and tangy flavor of this bread creates exceptional French toast. Dip in a mixture of eggs, vanilla, and cinnamon before cooking in butter.
- Bread Bowls – Shape smaller portions of dough into rounds to create bread bowls for serving hearty soups like mushroom or butternut squash bisque.
- Bruschetta Base – Slice, toast, and rub with garlic for the perfect base for fresh tomato bruschetta or bean purees.
- Sandwiches – This bread holds up beautifully for substantial sandwiches without crumbling or falling apart like many gluten free breads.
- Alongside Soups – The tangy flavor complements both creamy and broth-based soups. Try it with roasted tomato soup for a classic combination.
- Cheese Board Companion – Include slices on a cheese board with dairy-free spreads, olives, and fruit for an impressive appetizer spread.
Nutrition Value for gluten free sourdough bread
| Nutrient | Amount per Slice* | % Daily Value |
| Calories | 120 | 6% |
| Total Fat | 2.5g | 3% |
| Saturated Fat | 0.3g | 1.5% |
| Sodium | 230mg | 10% |
| Total Carbohydrate | 22g | 8% |
| Dietary Fiber | 3g | 11% |
| Sugars | 0.5g | 1% |
| Protein | 2.5g | 5% |
| Iron | 0.7mg | 4% |
| Calcium | 20mg | 2% |
| Potassium | 85mg | 2% |
*Based on a loaf yielding 12 slices. These values are estimates and may differ depending on the exact ingredients used.
The nutritional profile of this gluten free sourdough bread is impressive compared to many store-bought gluten free breads. The fermentation process increases the bioavailability of nutrients, while the diverse flour blend provides a more complete nutritional profile than single-flour products. The psyllium husk adds significant fiber, which is often lacking in gluten free diets.
Additionally, the natural fermentation process reduces the glycemic index compared to regular gluten free bread, making this bread a better option for those watching their blood sugar levels. The minimal ingredients and lack of artificial preservatives, emulsifiers, and excessive sugars make this a healthier choice for anyone following a gluten free diet.
Expert Tips & FAQs for gluten free sourdough bread
Expert Tips for Success
- Temperature Matters – Monitor your kitchen temperature and adjust fermentation times accordingly. Warmer kitchens require shorter fermentation, cooler kitchens need longer.
- Measure by Weight – For consistent results, always use a digital scale rather than volume measurements. Gluten free flour densities vary significantly.
- Don’t Rush the Starter – A mature gluten free starter takes longer to develop than wheat versions sometimes up to two weeks. Patience yields the best flavor and rise.
- Hydration is Key – Gluten free flours absorb water differently than wheat flour. If your dough seems too dry or stiff, don’t hesitate to add water a tablespoon at a time.
- The Cold Proof is Non-Negotiable – The extended refrigeration period develops flavor and improves texture significantly. Don’t skip this step, even if you’re in a hurry.
- Invest in a Dutch Oven – The steam trapped by the Dutch oven creates the perfect environment for a beautiful rise and crust formation.
Frequently Asked Questions
Why did my bread turn out gummy in the center?
Gummy centers are usually caused by underbaking or cutting the bread before it’s completely cool. Ensure your oven is properly calibrated, bake until the internal temperature reaches 205-210°F, and allow the bread to cool COMPLETELY (at least 2 hours) before slicing.
My starter isn’t getting bubbly. What am I doing wrong?
First, check your water chlorinated water can inhibit microbial activity. Also, try feeding with a mixture of flour types to provide more diverse food sources for the microorganisms. Keep your starter in a warmer location (75-85°F), and be patient gluten free starters often take longer to become active.
Can I use commercial gluten free flour blends instead of mixing my own?
While convenient, most commercial blends contain gums and other ingredients that can interfere with the sourdough process. If you must use a blend, choose one without added xanthan gum or other stabilizers and adjust the hydration as needed.
Why did my loaf spread out instead of rising up?
This is common with gluten free sourdough. Make sure your banneton is well-floured, your dough has enough psyllium husk for structure, and you’re not over-proofing. The shaped dough should feel somewhat firm, not overly soft or liquid.
How can I tell when my bread is properly proofed and ready to bake?
Unlike wheat sourdough, the “poke test” isn’t as reliable with gluten free dough. Instead, look for visual cues: the dough should have increased in size by about 50%, show some bubbles on the surface, and feel slightly domed and puffy. For cold-proofed dough, 12-24 hours in the refrigerator is typically sufficient.
Do I need to feed my starter differently than wheat starters?
Yes, gluten free starters often benefit from more frequent feedings (twice daily in warm weather) and may need slightly higher hydration. Many bakers find success using a mixture of different gluten free flours rather than a single type.
Conclusion
The journey to perfect gluten free sourdough bread may seem daunting at first, but the rewards are truly worth the effort. That first bite of homemade bread with a crackling crust and tender, airy interior is a moment of pure joy for anyone who’s had to eliminate gluten from their diet. Remember that sourdough baking is both a science and an art each loaf teaches you something new and helps you refine your technique.
The five secrets we’ve explored creating a robust gluten free starter, using the right flour combination, understanding the crucial role of psyllium husk, mastering the cold fermentation process, and creating steam for the perfect bake are your foundation for success. But don’t stop here! Sourdough baking is a journey of continuous discovery and improvement.
Have you tried making gluten free sourdough bread before? What were your biggest challenges? Share your experiences in the comments below I’d love to hear about your baking adventures and answer any questions you might have.
Don’t forget to subscribe to my newsletter for more gluten free sourdough bread baking tips and recipes delivered straight to your inbox. You can also follow me on Instagram where I share daily baking inspiration and troubleshooting tips. Tag your creations with #GFSourdoughSuccess so I can see and celebrate your beautiful loaves!
Happy baking, and remember even the “failures” make great breadcrumbs or croutons!